Price agreement plugin

Introduction to the Price agreement plugin
The Price agreement plugin is a useful tool for managing quantity discounts and special pricing for customers and suppliers. It allows you to set up to five (5) levels of quantity discounts that can be applied to specific debtors or groups of debtors. Additionally, you can set a special price for individual debtors per product. These prices will overrule the default Selling price 1 / 2 / 3 and can be set per debtor (customer / client).
The plugin also includes a field for adding the supplier's product number, making it easy to manage multiple suppliers. You can also add information text explaining why a debtor has a special price.
Discount percentages are used to show customers the discount they are getting, based on the default price you have set for the debtor. The plugin also allows you to link prices from stock group to debtor group, making it easy to maintain price agreements for larger groups.
You can set up price agreements in a variety of ways, including discount on the default sales price, percentage of the average cost price, percentage of the latest cost price, and amount per item. The Price agreement plugin also allows you to set start and end dates for the agreement.
Once the plugin is activated, it creates a Price agreement tab for each of your stock items, debtor accounts, and creditor accounts (if the creditors module is activated). This makes it easy to manage price agreements across your entire business.
Setup of Price agreements
Activate Price agreement
Once activated, you can access the Price agreement tab for stock items, debtor accounts, and creditor accounts to set up quantity discounts and special pricing. You can define price agreements in various ways, including discount on the default sales price, percentage of the average cost price, percentage of the latest cost price, and amount per item. You can also set start and end dates for the agreement and link prices from stock group to debtor group.
To set up price agreements and activate the Price agreement plugin, follow these steps:
- Click on the Setup ribbon and select Plugins → Document plugins → Price agreement.
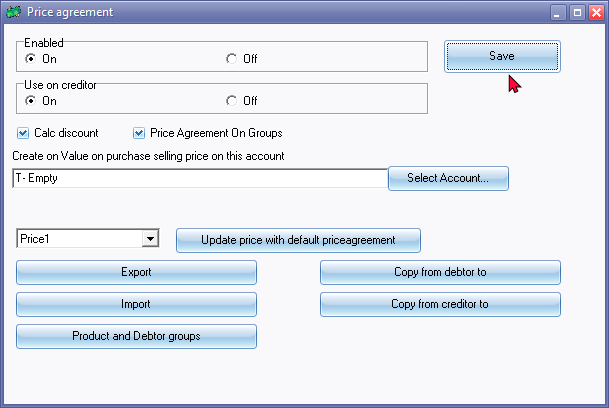
- Select the On option to activate the plugin. This will create a Price agreement tab for stock items, debtor accounts, and creditor accounts (if applicable).
- If necessary, select the following options:
- Calc discount - If selected, the plugin will calculate the discount for stock items and display the percentage discount on document layout files.
|
|
If this option is not selected, no discount will be calculated on documents and layout files. The unit price will be displayed as set for the quantities. |

- Price Agreement on On Groups - This option applies price agreements to debtor groups.
- Price - Select one of the three (3) prices on the list.
- Create on Value on purchase selling price on this account - Select a General ledger account, if applicable. Create on Value on purchase selling price on this account: Select a General ledger account, if applicable.
- Export - This option creates a tab-delimited text file that can be opened in a text editor or spreadsheet program.
- Import - This option imports a valid tab-delimited text file created using the Export option.
- Copy from debtor to - Select a stock item from the list. Copy from debtor to: Select a stock item from the list to copy price agreements from a debtor to a stock item.
- Copy from creditor to - Select a stock item from the list. Copy from creditor to: Select a stock item from the list to copy price agreements from a creditor to a stock item.
- Product and Debtor groups - This option may be used to assign selected products (stock items) to debtor (customer / client) accounts linked to selected debtor / customer / client groups. Product and Debtor groups: Use this option to assign selected products (stock items) to debtor accounts linked to selected debtor groups.
- Click on the Save button to activate the Price agreement plugin.
Product and Debtor groups
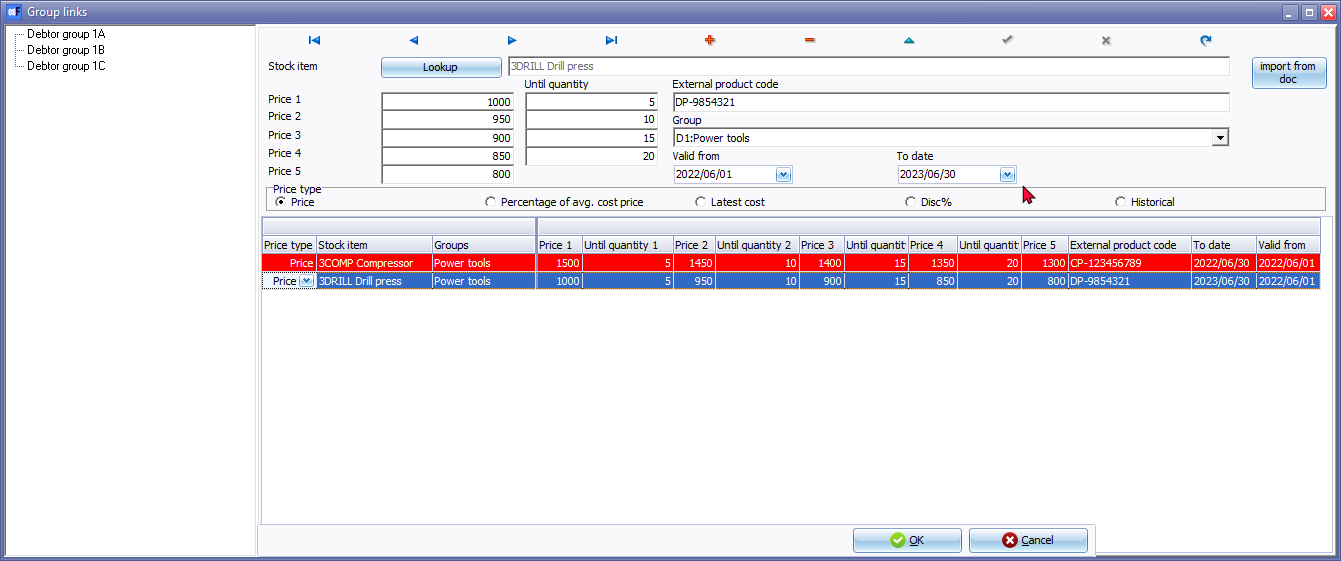
To manage stock groups and debtor groups for price agreements, you may click on the Product and Debtor groups button of the "Price agreement" setup screen.
Before you can use the "Group links" Product and debtor groups option, the "Product and Debtor groups" option must be selected (marked) to set the price agreements on debtor groups.
|
|
Red - Font / Column colours If the date in the "To date" field and the "To date" column is expired (earlier than today's system date, the record will be displayed in a Red - Font / Column colour. |

Setup Groups
You can create up to two (2) Report groups for inventory items (products), debtors (customers / clients) and creditors (suppliers / vendors). These debtor (customer / client) and creditor (supplier / vendor) groups can be selected when selecting on the Price agreement tab of a selected stock item (product).
The use of these groups is optional, but it will provide the facility to view the price agreements, discount, etc. set and analyse per group.
Before report groups can be linked, the following report groups must already exist:
- Debtor group - Manage groups for debtors (customers / clients).
- Creditor group - Manage groups for creditors (suppliers / vendors).
- Stock group - Manage groups for stock items (products).
Price agreement tabs
Price agreement tab Stock items
Price agreement tab Stock items - Sales
You may manage price agreements from the Price agreement tab of the Stock items screen. Price agreements may be added, edited or deleted for debtors (customer / client) accounts and for creditor (supplier / vendor) accounts.
To set Price agreements for Stock items:
- On the Default ribbon, select Stock items.
- Select a specific Stock item (product).
- Click on the Edit button. (Alternatively, you may double-click on the selected stock item).
- Click on the Price agreement tab.
- Select Sales (default) for debtor (customer / client) accounts.
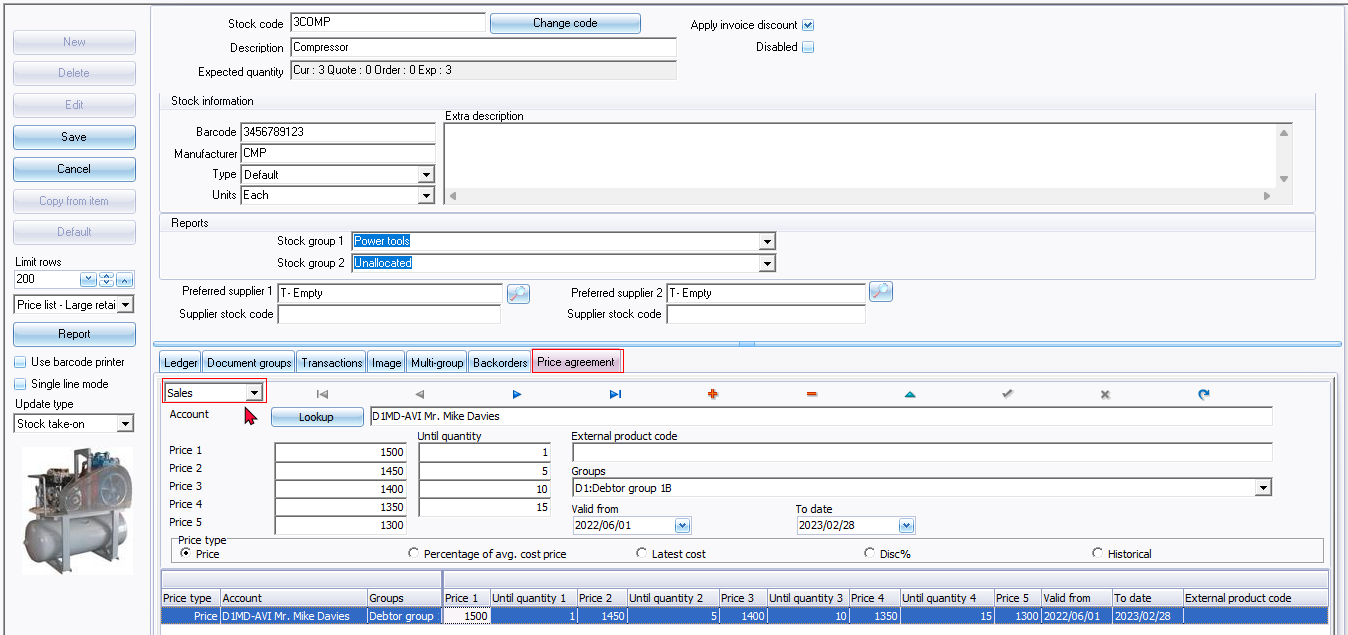
- Click on the Lookup button to select the debtor (customer / client) account(s).
- To manage the Price agreements, you first need to decide what Price type you need to select. This will change the descriptions for Price 1, Price 2, Price 3, Price 4 and Price 5. This will then determine the values you need to enter for each of the price types. Select one of the following Price types and enter the values and until quantities as follows:
- Price: Debtor - Enter the actual selling prices (usually lower than the default selling price of the debtor (customer / client)) and quantities.
- Percentage of avg. cost price - Enter the percentages of the average cost price.
- Latest cost - Enter the actual cost prices
- Disc % - Enter the percentage of the discount quantities.
- Historical - Enter the prices based on historical value and the quantities.
- External product code - Enter the product code for the debtor (customer / client), if available.
- Groups - You may select a debtor (customer / client) group).
- Valid from ... To date - Select the date of when the price agreement is valid. If the Price Agreement is only valid for a specific period, select the date on which the price agreement will expire.
- Click on the Post edit
 record button to save the changes.
 - Click on the Save button of the stock item screen.
Price agreement tab Stock items - Purchases
You may manage price agreements from the Price agreements tab of the Stock items screen. Price agreements may be added, edited or deleted for debtors (customer / client) accounts and for creditor (supplier / vendor) accounts.
To set Price agreements for Stock items:
- On the Default ribbon, select Stock items.
- Select a specific Stock item (product).
- Click on the Edit button. (Alternatively, you may double-click on the selected stock item).
- Click on the Price agreement tab.
- Select Purchases for creditor (supplier / vendor) account(s).
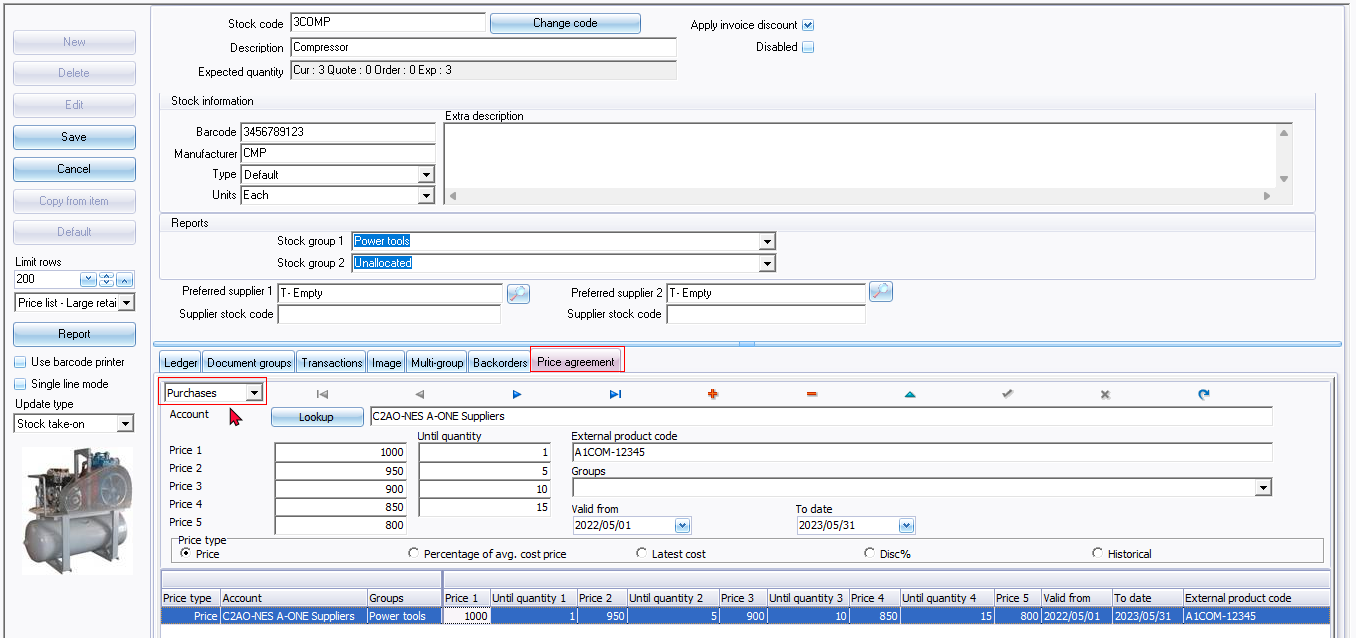
- Click on the Lookup button to select the creditor (supplier / vendor) account(s).
- To manage the Price agreements, you first need to decide what Price type you need to select. This will change the descriptions for Price 1, Price 2, Price 3, Price 4 and Price 5. This will then determine the values you need to enter for each of the price types. Select one of the following Price types and enter the values and until quantities as follows:
- Price: - Creditor – Enter the actual cost prices (usually lower than the cost price of the creditor (supplier / vendor)) and quantities.
- Percentage of avg. cost price - Enter the percentages of the average cost price.
- Latest cost - Enter the actual cost prices.
- Disc % - Enter the percentage of the discount quantities.
- Historical - Enter the prices based on historical value and the quantities.
- External product code - Enter the product code for the creditor (supplier / vendor), if available.
- Groups - You may select a creditor (supplier / vendor) group (if Purchases is selected).
- Valid from ... To date - Select the date of when the price agreement is valid. If the Price Agreement is only valid for a specific period, select the date on which the price agreement will expire.
- Click on the Post edit record button to save the changes.
- Click on the Save button of the stock item screen.
Price agreement tab - Debtors (Customers / Clients)
You may manage price agreements from the Price agreements tab of the debtor (customer / client) screen. Price agreements may be added, edited or deleted for stock items.
To set Price agreements for Debtors (Customers / Clients):
- On the Default ribbon, select Debtor.
- Select a debtor (customer / client) account on the list.
- Click on the Edit button. (Alternatively, you may double-click on the selected debtor (customer / client) account).
- Click on the Price agreement tab.
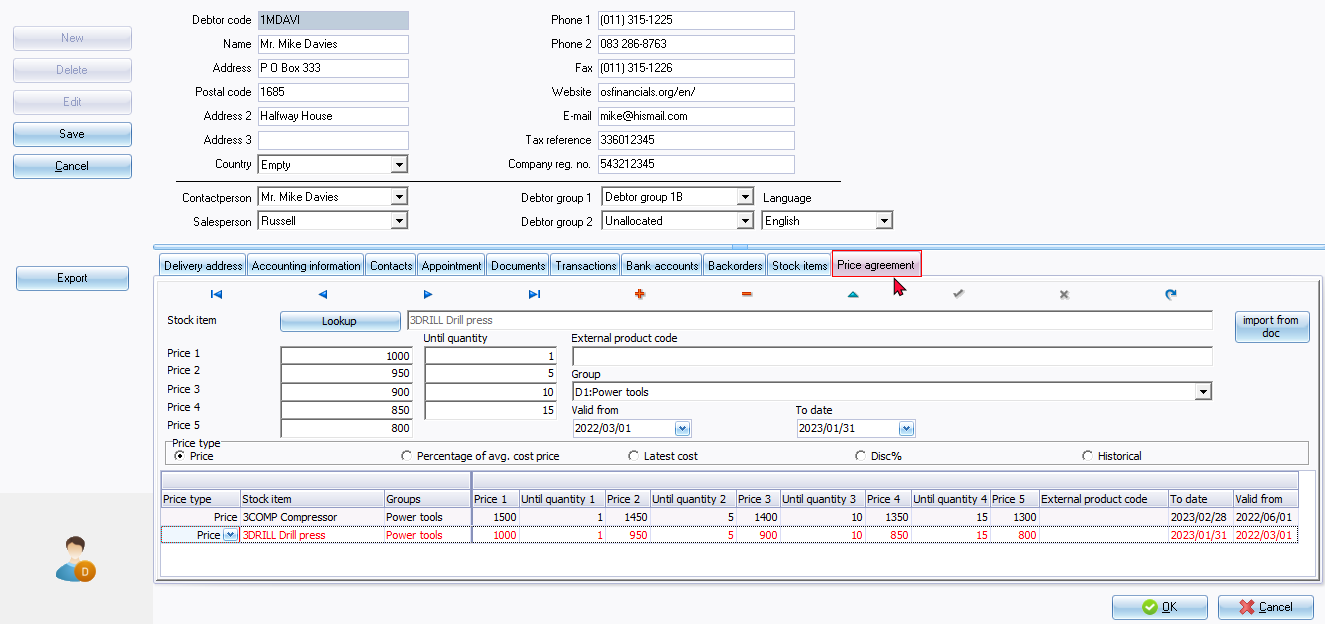
|
|
Red - Font / Column colours If the date in the "To date" field and the "To date" column is expired (earlier than today's system date, the record will be displayed in a Red - Font / Column colour. |
- Click on the Lookup button to select the stock item.
- To manage the Price agreements, you first need to decide what Price type you need to select. This will change the descriptions for Price 1, Price 2, Price 3, Price 4 and Price 5. This will then determine the values you need to enter for each of the price types. Select one of the following Price types and enter the values and until quantities as follows:
- Price - Enter the actual selling prices (usually lower than the default selling price of the debtor (customer / client)) and quantities.
- Percentage of avg. cost price - Enter the percentages of the average cost price.
- Latest cost - Enter the actual cost prices.
- Disc % - Enter the percentage of the discount quantities.
- Historical - Enter the prices based on historical value and the quantities.
- External product code - Enter the product code for the debtor (customer / client), if available.
- Groups - You may select a stock group from the list.
- Valid from ... To date - Select the date of when the price agreement is valid. If the Price Agreement is only valid for a specific period, select the date on which the price agreement will expire.
- Click on the Post edit record button to save the changes.
- Click on the Save button of the debtor (customer / client) account screen.
Price agreement tab - Creditors (Suppliers)
You may manage price agreements from the Price agreements tab of the creditor (supplier / vendor) screen. Price agreements may be added, edited or deleted for stock items.
To set Price agreements for Creditors (Suppliers):
- On the Default ribbon, select Creditor.
- Select a creditor (supplier / vendor) account on the list.
- Click on the Edit button. (Alternatively, you may double-click on the selected creditor (supplier / vendor) account).
- Click on the Price agreement tab.
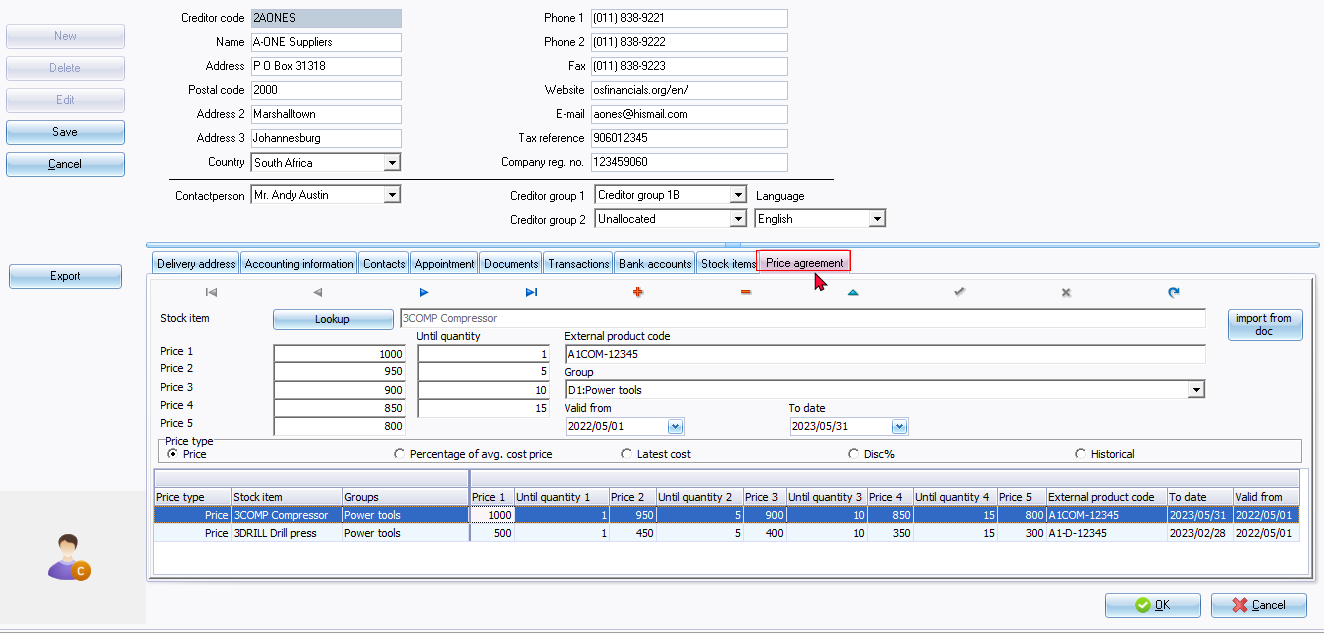
|
|
Red - Font / Column colours If the date in the "To date" field and the "To date" column is expired (earlier than today's system date, the record will be displayed in a Red - Font / Column colour. |
- Click on the Lookup button to select the stock item.
- To manage the Price agreements, you first need to decide what Price type you need to select. This will change the descriptions for Price 1, Price 2, Price 3, Price 4 and Price 5. This will then determine the values you need to enter for each of the price types. Select one of the following Price types and enter the values and until quantities as follows:
- Price - Enter the actual cost prices (usually lower than the cost price of the creditor (supplier / vendor)) and quantities.
- Percentage of avg. cost price - Enter the percentages of the average cost price.
- Latest cost - Enter the actual cost prices.
- Disc % - Enter the percentage of the discount quantities.
- Historical - Enter the prices based on historical value and the quantities.
- External product code - Enter the product code for the or creditor (supplier / vendor), if available.
- Groups - You may select a stock group from the list.
- Valid from ... To date - Select the date of when the price agreement is valid. If the Price Agreement is only valid for a specific period, select the date on which the price agreement will expire.
- Click on the Post edit record button to save the changes.
- Click on the Save button of the creditor (supplier / vendor) screen.
Processing Documents for Price agreements
Price agreements may be used when processing documents:
- Normal document processing
- Standard POS
- RetailPOS plugin
- HorecaPOS plugin
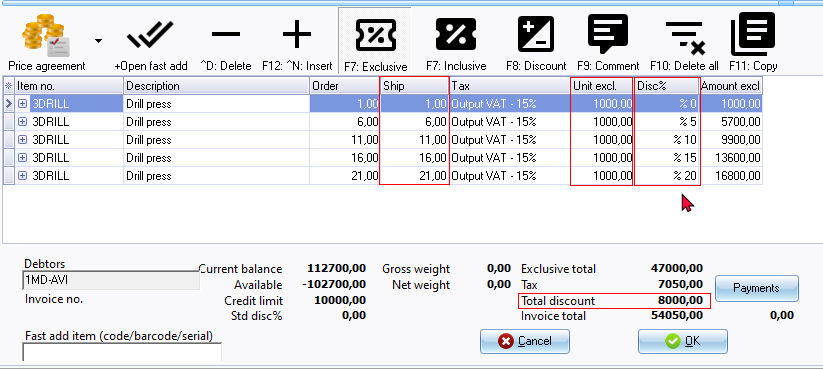
When processing sales documents (i.e. invoices, credit notes and quotes) and quantities are entered which match your price agreement settings, it will automatically calculate the discount.
Calc discount setting
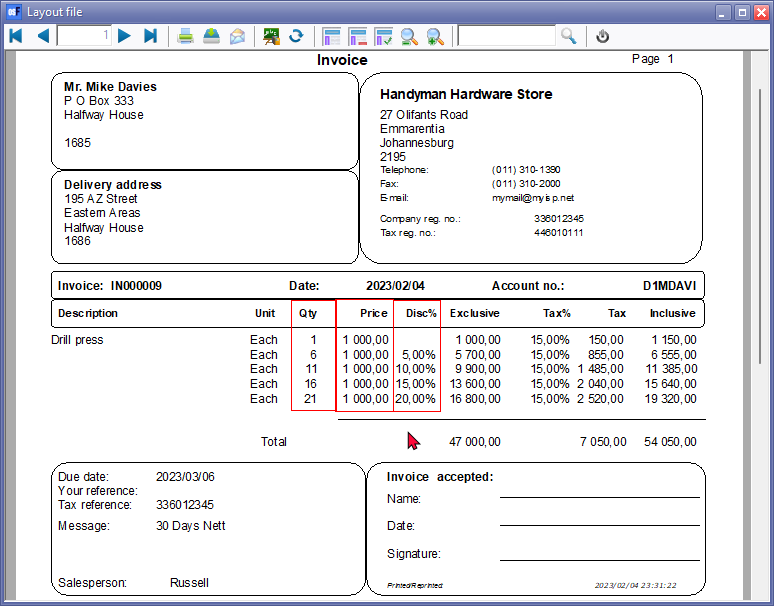
Depending on the "Calc discount" setting (on Plugins → Document plugins → Price agreement (Setup ribbon)), the processing and printing of layout files will be displayed as follows:
Calc discount setting on
The Unit price is always displayed as the actual unit price for 1 unit. The percentage discount is automatically calculated on the number of quantities specified in the "Ship" field and the total net price, after discount is taken into account, is listed in the "Amount exclusive" or "Amount inclusive" column. The discount amount is displayed in the "Total discount" field of the document footer.
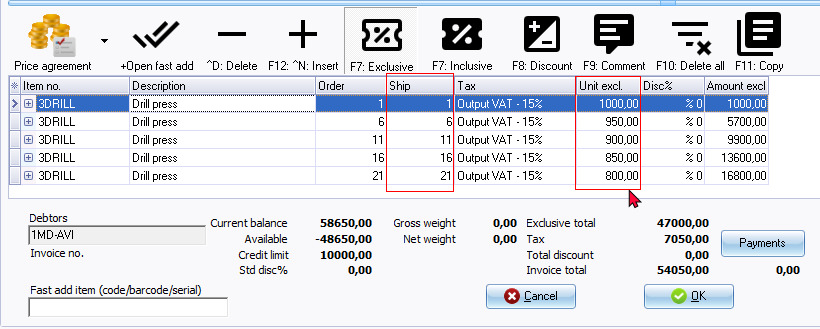
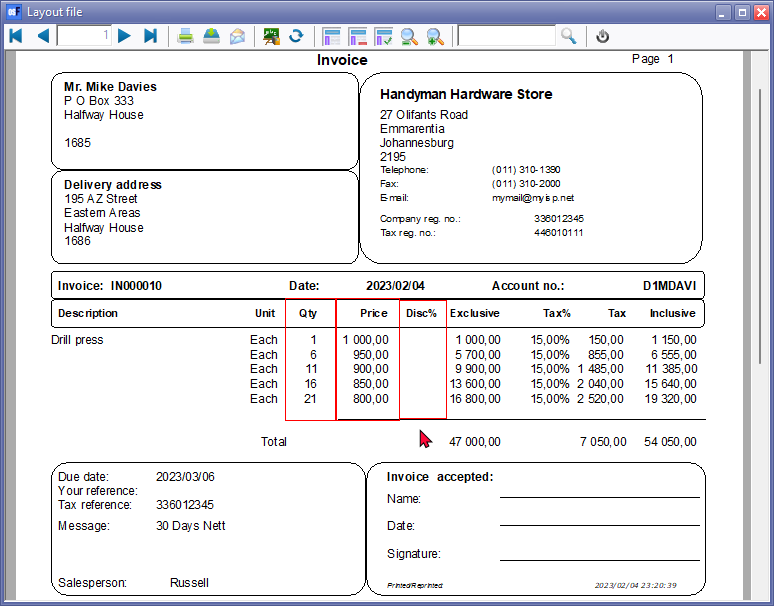
Calc discount setting off
The Unit price is displayed as the actual price for the unit quantities specified in the "Ship" field. No discount amount is displayed in the "Total discount" field of the document footer.
When processing purchase documents (i.e. purchases, supplier returns and orders) and quantities are entered which match your price agreement settings, it will automatically calculate the discount.
Price agreement reports
You may print lists of the price agreements.
Print Price agreements for Debtors (Customers / Clients)
To print Price agreement reports for debtors (customers / clients):
- On the Reports ribbon, select Reports → Plugins → Price agreement.
- Select the "Debtor - Price agreement" report (default option).
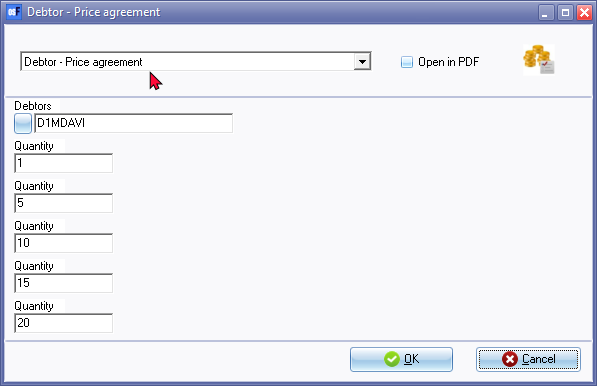
- Select the debtor (customer / client) account or creditor (supplier / vendor) account.
- Enter up to 5 quantities.
- Click on the OK button.
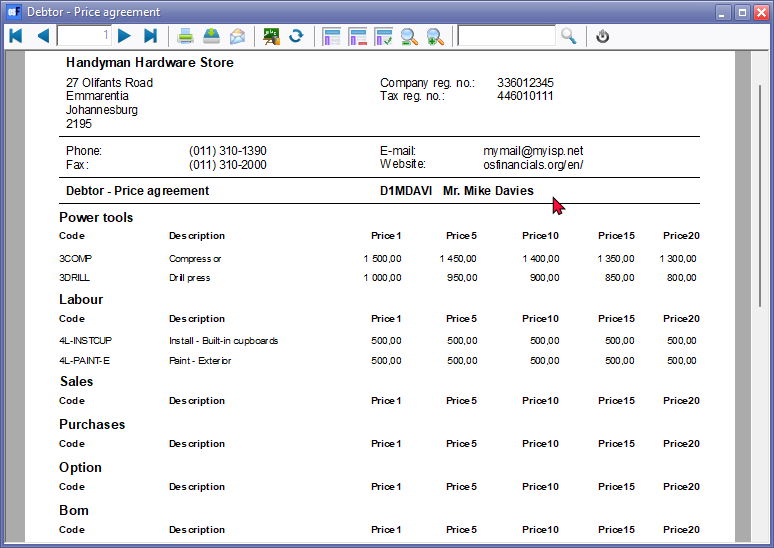
An example of the "Debtor Price agreement" report, is as follows:
|
|
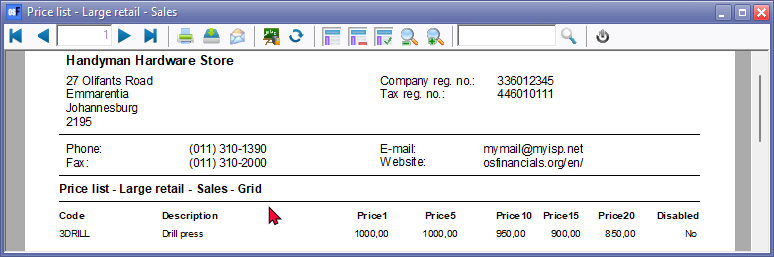
Print single item context menu option on Stock items (Default tab) Select the "Price list - Large retail - Sales" report option. Select the Stock item (product) and right-click - select Print single item option on the context menu.
|

Print Price agreements for Creditors (Suppliers / Vendors)
To print Price agreement reports for creditors (suppliers / vendors):
- On the Reports ribbon, select Reports → Plugins → Price agreement.
- The "Debtor - Price agreement" is the default option. Select the "Creditor - Price agreement" report.
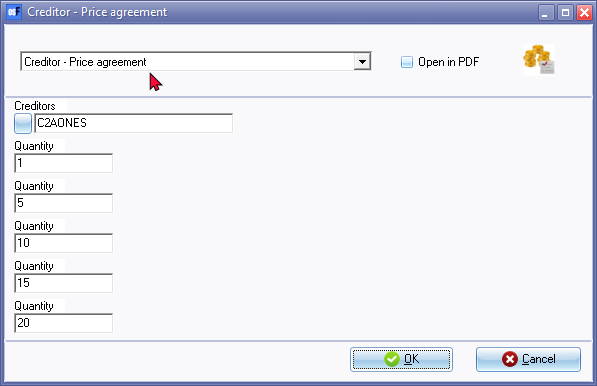
- Select the creditor (supplier / vendor) account.
- Enter up to 5 quantities.
- Click on the OK button.
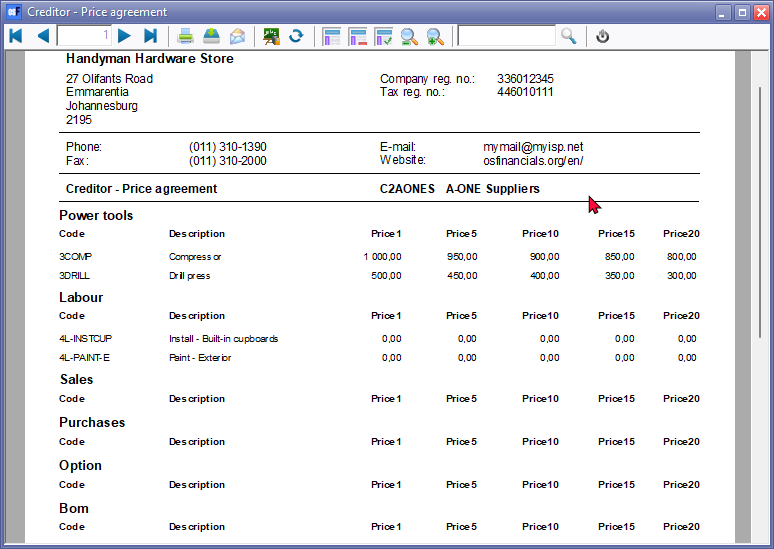
An example of the "Creditor Price agreement" report, is as follows:
|
|
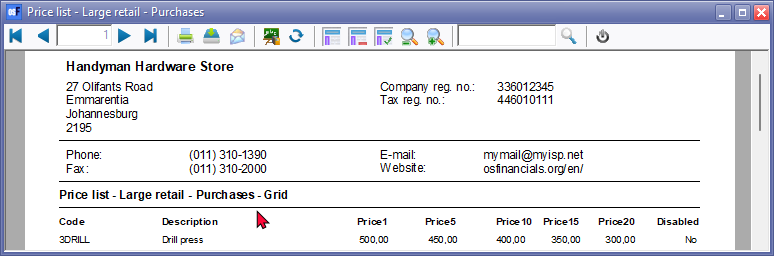
Print single item context menu option on Stock items (Default tab) Select the "Price list - Large retail - Purchases" report option. Select the Stock item (product) and right-click - select Print single item option on the context menu.
|